Complete Guide to Light Painting Photography: Techniques and Tips
Photography has always thrived on creativity and innovation. One creative technique that has captured the imagination of many photographers in recent years is painting with light. This ingenious method uses long exposure times and handheld lights to quite literally draw or paint images right in the air. The results are often stunning – creating photographs that have an ethereal, surreal quality unlike anything else.
If you want to try your hand at painting with light, you’ve come to the right place. This complete guide will provide everything you need to know to start capturing breathtaking light painted images. We’ll cover the necessary equipment, walk through techniques step-by-step, and share tips for taking your images to the next level. Whether you’re a seasoned pro or just starting out, you’ll find valuable insights here to help you master this unique art and take your photography skills to new creative heights.
What is Light Painting Photography?
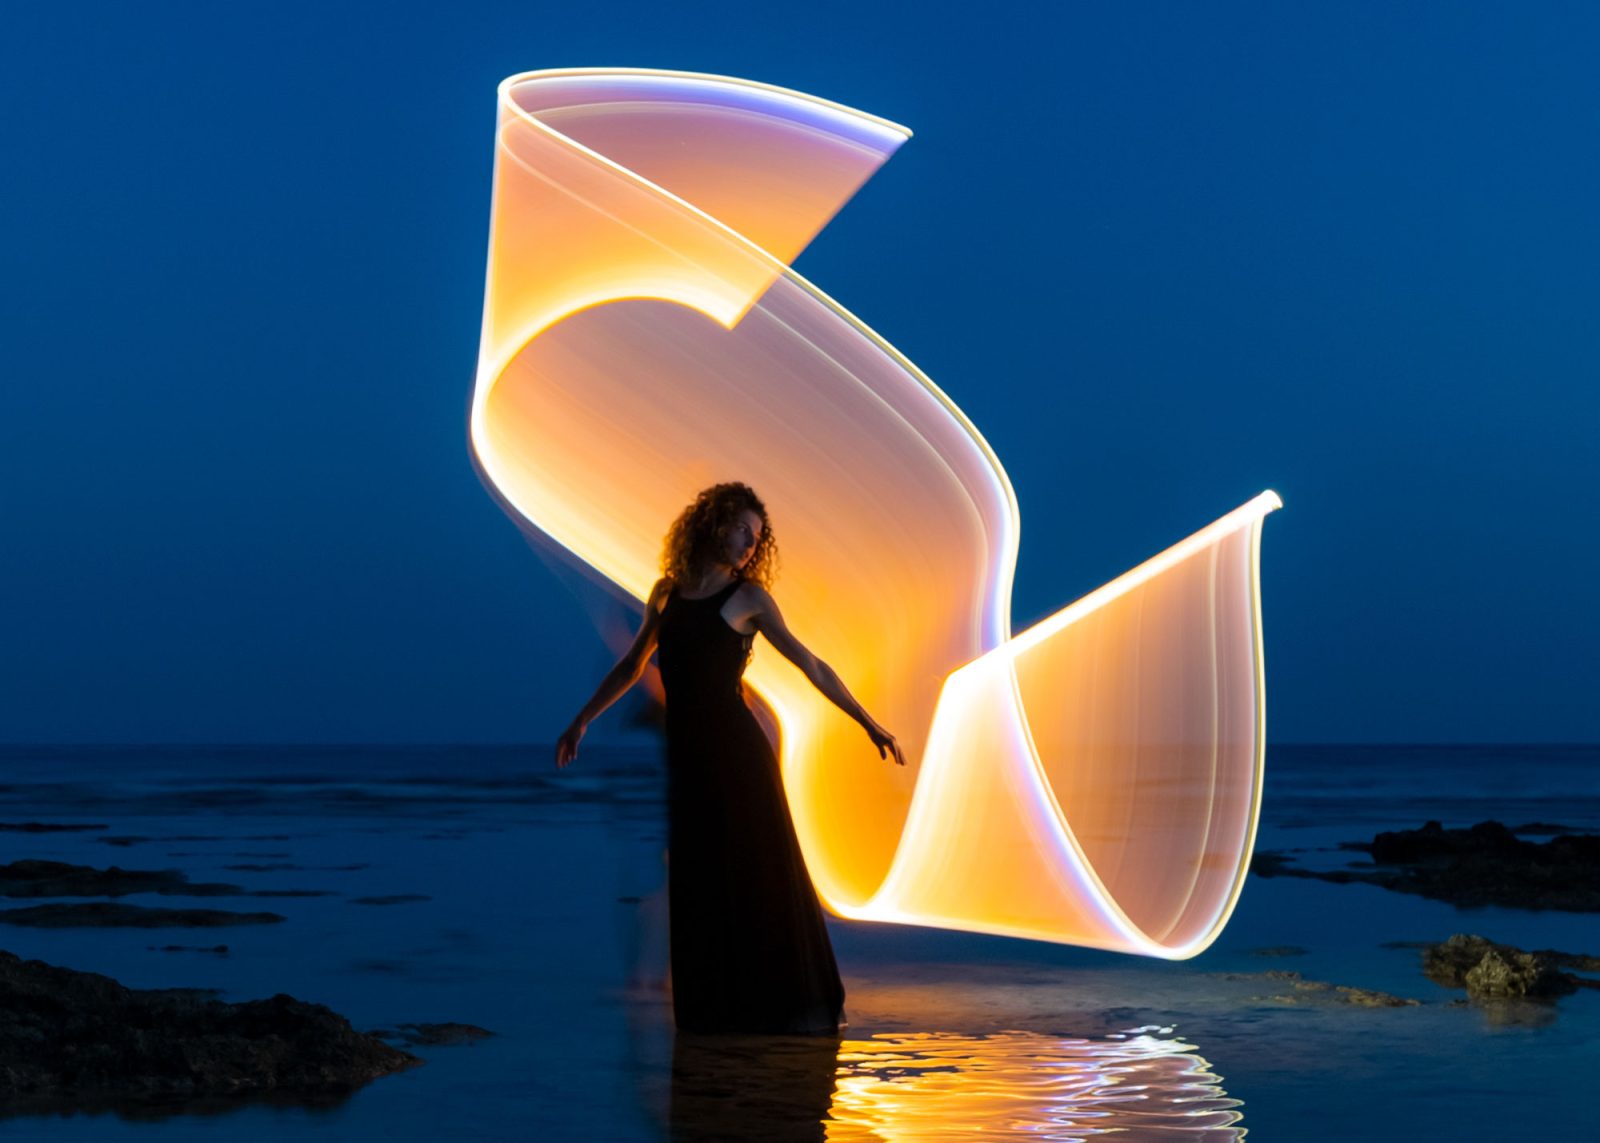
Light painting photography is a unique technique that allows photographers to create stunning images by using a light source to paint or draw in the air while taking a long exposure photograph. This technique can be used to create a wide range of effects, from simple light trails to complex and intricate designs.
To create a light painting photograph, the photographer typically works in a dark environment, such as a studio or outdoors at night. They use a handheld light source, such as a flashlight, glow stick, or even a mobile phone, to draw or paint in the air while the camera’s shutter remains open for an extended period of time.
The result is a photograph that captures the movement of the light source, creating an ethereal and otherworldly effect. Light painting photography is a popular technique among photographers who want to create unique and visually stunning images.
One of the key benefits of light painting photography is that it allows photographers to create images that are not possible using traditional photography techniques. By using a light source to create designs and patterns in the air, photographers can create images that are truly one-of-a-kind.
Overall, light painting photography is a fascinating and creative technique that can produce some truly stunning results. Whether you are a professional photographer or an amateur, experimenting with light painting can be a fun and rewarding way to push the boundaries of your creativity.
Best Camera Settings for Light Painting
When it comes to light painting photography, the camera settings play a crucial role in capturing the perfect shot. Here are some recommended camera settings for light painting:
Shutter Speed
Long exposure is the key to capturing light painting images. A shutter speed of 30 seconds or longer is ideal for capturing light trails and other light effects. Keep in mind that the longer the shutter speed, the more light will be captured, which can result in overexposure. Experiment with different shutter speeds to find the perfect balance.
Aperture
A wide aperture (low f-stop number) is recommended for light painting photography. This allows more light to enter the camera, which is necessary when working with low light conditions. However, keep in mind that a wide aperture can result in a shallow depth of field. If you want everything in focus, consider using a smaller aperture (higher f-stop number).
ISO
A low ISO is recommended for light painting photography to reduce noise in the image. ISO 100-400 is a good starting point, but you can adjust it as necessary depending on the lighting conditions.
Focus
Manual focus is recommended for light painting photography. Autofocus may struggle to find a focus point in low light conditions. Use a flashlight to manually focus on your subject before starting the exposure.
White Balance
Set your white balance to “tungsten” or “incandescent” to avoid color casts from artificial light sources. If shooting in RAW format, you can adjust the white balance in post-processing.
Other Considerations
- Use a tripod to keep your camera steady during the long exposure.
- Use a remote shutter release or the camera’s self-timer to avoid camera shake.
- Shoot in RAW format to have more flexibility in post-processing.
By using these recommended camera settings, you can capture stunning light painting images with your camera.
Step-by-Step Guide to Setting Up Your Camera
To capture stunning light painting photographs, it’s essential to set up your camera correctly. Follow these steps to ensure you’re ready to start light painting:
- Choose the right camera: While you can use any camera for light painting, it’s best to use a camera that allows you to manually adjust the shutter speed, aperture, and ISO. This will give you more control over your exposure and enable you to capture the perfect shot.
- Select a lens: The lens you choose will depend on the type of shot you want to capture. For light painting, a wide-angle lens is often the best choice, as it allows you to capture more of the scene in a single shot.
- Set your camera to manual mode: To take full control of your camera’s settings, switch to manual mode. This will allow you to adjust the shutter speed, aperture, and ISO to your liking.
- Adjust the shutter speed: To capture light trails, you’ll need to use a slow shutter speed. Start with a shutter speed of around 30 seconds and adjust as needed.
- Set the aperture: The aperture controls the amount of light that enters the camera. For light painting, a small aperture (high f-stop number) is often best, as it will create a deeper depth of field and keep your entire scene in focus.
- Adjust the ISO: The ISO controls the camera’s sensitivity to light. For light painting, a low ISO is often best, as it will reduce the amount of noise in your photos.
- Focus your camera: To ensure your photos are sharp, focus your camera on the subject before you start light painting. You can use manual focus or autofocus, depending on your camera and lens.
- Use a tripod: To avoid camera shake and ensure your photos are sharp, use a tripod to keep your camera steady during the long exposure.
With these steps, you’ll be ready to start capturing stunning light painting photos. Remember to experiment with different settings and techniques to find the perfect shot.
Essential Equipment for Light Painting
To get started with light painting, you will need some essential equipment. Here are the most important items you will need:
Camera
The camera is the most important piece of equipment for light painting photography. You will need a camera with manual controls so that you can adjust the shutter speed, aperture, and ISO. A DSLR or mirrorless camera is ideal, but you can also use a point-and-shoot camera with manual controls.
Lens
A wide-angle lens is recommended for light painting photography as it allows you to capture a wider field of view. A lens with a maximum aperture of f/2.8 or wider is also recommended as it allows more light to enter the camera, making it easier to capture the light trails.
Tripod
A sturdy tripod is essential for light painting photography as you will be taking long exposure shots. A tripod will keep your camera steady and prevent camera shake, resulting in sharper images. Look for a tripod that is lightweight and easy to carry around.
Light Source
A light source is the tool that enables you to paint with light in your images. There are many different types of light sources you can use, including flashlights, LED lights, and glow sticks. You can also use a sparkler or a steel wool pad for more dramatic effects.
Wireless Shutter Release
A wireless shutter release is recommended for light painting photography as it allows you to trigger the shutter without touching the camera. This reduces the risk of camera shake and ensures sharper images. You can also use the camera’s self-timer function if you don’t have a wireless shutter release.
Overall, having the right equipment is essential for light painting photography. With the right camera, lens, tripod, light source, and wireless shutter release, you can create stunning light painting images that are sure to impress.
Types of Light Sources
Light painting photography requires a light source to create the desired effect. There are various types of light sources that can be used for light painting, including torches, sparklers, and string lights. Each type of light source has its unique characteristics and can produce different effects.
Torch
Torch is one of the most commonly used light sources for light painting. It is a handheld device that produces a bright, focused beam of light. Torches are available in different sizes and shapes, and they can be used to create a range of effects, from narrow, concentrated lines to broad, sweeping strokes. They are also easy to control, making them an ideal choice for beginners.
Sparkler
Sparklers are another popular light source for light painting. They are handheld devices that produce a shower of sparks when lit. Sparklers can be used to create a range of effects, from thin, delicate lines to thick, bold strokes. They are also available in different colors, making them ideal for creating colorful light paintings.
String Lights
String lights are a type of light source that consists of a string of small, low-powered bulbs. They are often used for decorative purposes, but they can also be used for light painting. String lights can be used to create a range of effects, from delicate, twinkling patterns to bold, sweeping strokes. They are also easy to control, making them an ideal choice for beginners.
In addition to these three main types of light sources, there are many other types of light sources that can be used for light painting, including LED lights, flashlights, and even candles. Each type of light source has its unique characteristics and can produce different effects. The choice of light source depends on the desired effect, the level of control required, and the photographer’s personal preference.
Light Painting Tips and Techniques
Light painting is a unique and creative technique that allows photographers to create stunning and imaginative images. Here are some tips and techniques that can help you create beautiful light paintings:
- Plan your shot: Before you start light painting, it’s essential to plan your shot carefully. Think about the composition, the subject, and the lighting conditions. Decide on the type of light source you want to use and how you want to paint with it.
- Use a tripod: Long exposure times are essential for light painting, and any camera movement can ruin your shot. Use a sturdy tripod to keep your camera steady and prevent camera shake.
- Experiment with different light sources: There are many different types of light sources you can use for light painting, including flashlights, LED lights, and glow sticks. Experiment with different types of lights to see what works best for your shot.
- Use manual focus: In low light conditions, autofocus can struggle to find a focus point. Use manual focus to ensure that your subject is sharp and in focus.
- Practice, practice, practice: Light painting requires practice and patience. Don’t be discouraged if your first few attempts don’t turn out as expected. Keep experimenting, and you’ll soon master the technique.
By following these tips and techniques, you can create stunning and imaginative light paintings that are sure to impress. Remember to experiment with different light sources, plan your shots carefully, and practice, practice, practice.
Famous Light Painting Photographers
Light painting photography has been around for decades and has been mastered by some of the most talented photographers. Here are three famous light painting photographers that have made a significant impact in the world of photography.
Patrick Rochon
Patrick Rochon is a Canadian photographer and is widely regarded as one of the best light painting photographers in the world. He has been creating light paintings since 1992 and has won numerous awards for his work. Rochon specializes in portraits, nudes, and fashion editorial images. He has also collaborated with various artists, musicians, and brands to create unique light painting images.
Rochon’s light painting images are created using a variety of light sources, including LED lights, laser pointers, and flashlights. He uses long exposure techniques to capture the light trails and creates stunning images that are both surreal and captivating.
Troy Paiva
Troy Paiva is an American photographer and urban explorer who has been capturing night imagery since 1989. He is known for his light painting photography, which he considers to be a byproduct of his passion for investigating the ruins of “Lost America.” Paiva’s light paintings are created using a variety of light sources, including flashlights, glow sticks, and LED lights.
Paiva’s light painting images often feature abandoned buildings, vintage cars, and other objects that have been left to decay. He uses long exposure techniques to capture the light trails and creates images that are both haunting and beautiful.
Eric Staller
Eric Staller is an American photographer and artist who is widely regarded as one of the pioneers of light painting photography. He began experimenting with light painting in the 1970s and has been creating stunning light paintings ever since. Staller’s light paintings are often created using custom-built light sources, including light suits and lighted tricycles.
Staller’s light painting images are surreal and often feature people and objects that are illuminated in unusual ways. He uses long exposure techniques to capture the light trails and creates images that are both playful and thought-provoking.
These three famous light painting photographers have made a significant impact in the world of photography and have inspired countless others to experiment with light painting techniques.
Conclusion
In closing, painting with light opens up exciting creative possibilities in photography. Using long exposures and handheld lights, photographers can draw directly in the air to produce images that are dreamlike and surreal. It’s a technique that allows you to explore your artistic instincts and capture stunning visuals not possible otherwise.
Getting started with light painting does require some specialized gear like a camera with manual controls, a sturdy tripod, and light sources. You’ll need to experiment with settings and techniques to find what works best. Patience and practice are key. But the payoff is images that are sure to impress and delight.
So if you’re looking to ignite your creative spark, light painting is a great option. With the right approach, anyone can master this innovative technique for unique and mesmerizing photographic art. It’s a way to blend photography and artistry that opens up a whole new world of visual possibilities.